Monday, March 23, 2009

Layer Cake

A while back I wrote a blog on the occurrence of air stratification in homes. This is when warm and cold air layer in a room. Recently I came across a classic example of this during an energy audit. The infrared image at the right very distinctly shows how the air has layered in this room. The temperature difference between the ceiling and the floor, over 15 º F.

The second infrared image shows the same occurrence in a connected room.

The reasons for this happening are for one physics and the other poor installation of the heating ducts.

In Connecticut we heat our homes most of the year. Consequently the heating registers should be located when at all possible in or near the floor.

In the two rooms pictured the heating registers were placed in or near the ceiling. The bright spot in the second image is the heating register.

With the idea to evenly heat the room the installers placed return air ducts near the floor thinking the warm air will be drawn down by the ducts. Not surprisingly that theory did not pan out. What's more if return ducts could be installed near the floor, they just as easily could have been made heating ducts. This was true in the second room as well. A storage room behind the wall affords ample space to install the registers down low.

This is a standard case of physics winning out over mechanics, but by applying a little more mechanics the problem can be resolved. In the room with the high ceiling putting in a ceiling fan will almost assuredly resolve the issue. Ceiling fans are a good energy efficient way to "homogenize" the room air. Running the fan will evenly warm the space causing the heating system to run less often.

The second half of the solution would be to relocate the registers. Doing this will be more costly and labor intense than putting in the fan, but will further achieve the desired benefit of a more evenly heated space.

Identifying a problem such as this one would be difficult without the aid of an infrared camera. However an HVAC installer should be cognizant of this effect when placing duct work. In the instances when ducts are unable to be ideally placed suggesting a ceiling fan be installed would be good advice.

Layer cake is tasty, but not on a wall.

James Quarello JRV Home Inspection Services, LLC


To find out more about our other high tech services click on the links below:
Learn more about our Infrared Thermal Imaging & Diagnostics services.
Learn more about our energy audits, the Home Energy Tune uP®.

Tuesday, September 23, 2008

Saving Energy, Correctly Sizing Heating Systems

As an energy auditor being conscious of how large the heating system is relative to the homes size is extremely important. After all it is the heating system that is costing the homeowner quite a bit of money to operate. Not to mention keeping them warm. The problem is that most system, especially older systems, are often greatly over sized for the job. In fact it was standard practice in the past to oversize the heating system by as much as 30%!

The rule of thumb, not a precise measure, is generally 50,000 gross BTUs of heating per 1000 square feet of living space for older, minimally insulated homes. Today's newer homes can be as low as 30,000 gross BTUs per 1000 sq.ft. or even lower!

Getting back to older homes, the house may have a "newer" heating system that replaced an old dinosaur, but the new system was sized by simply replacing it with the same size unit as the original. So the new system may be more efficient, but is still using more energy than needed to provide adequate heat for the home.

Another and more important consideration is upgrades to the thermal envelope. In other words has the home been better insulated. Increasing insulation, replacing old leaky windows and sealing air leaks will lower the amount of required heating system BTUs. In fact these improvements should be made first before installing a new boiler or furnace.

Consider an example of a home I audited recently. The home was a 1950s split level with 1600 square feet of living space. Only 1250 sq. ft. was heated. A lower level family room was not conditioned, but could easily be incorporated into the heating system with some simple plumbing work. The gross BTUs of the boiler was 172,000. Using the rule of thumb above for an older home, the system should be around 62,500 BTUs for the conditioned space. Adding in the family room would bring the number to 80,000. Quite a large difference between what was installed and what was actually needed.

As I mentioned above if the home owners follow the recommendations in the audit report concerning adding insulation and sealing air leaks, it is conceivable that a new system could be even smaller.

So before deciding to change your heating system here are a few points to consider:

  • Get an energy audit. This will provide insight on where the home is most deficient and a plan on where to begin sensibly improving the home cost effectively.
  • Before installing a new heating system improve the homes thermal envelope by making the necessary improvements outlined in your energy audit report.
  • Be sure your heating system installer is considering all the improvements to your home when sizing the new system, not just going by the old system size.

There are always variables that can affect the sizing of any homes system. Therefore the rule of thumb is not a substitute for a competent, licensed heating specialist and the proper heating system size estimating tools. It can however give some idea as to where the size of the system should be in relation to the homes size and can raise a red flag for an educated homeowner.

James Quarello
JRV Home Inspection Services, LLC

Monday, December 31, 2007

Energy Audits, Why You Can’t Do It Yourself

As utility cost rise everyone is looking for was to save on their energy bills. The internet, the daily paper and magazines all have tips for reducing your energy usage and expenses. These little bits of energy saving insight are great advice, but are no substitute for a professional energy audit.

A full scale energy audit evaluates the entire home for inefficiency. The audit report provides valuable information on estimated costs to upgrade individual components and their expected payoff through energy savings realized. In addition the auditor uses specialized tools such as an infrared camera and or a blower door fan, which can locate unseen and unexpected areas of energy loss.

A homeowner simply making repairs based on tips or advice is likely missing the most cost effective upgrades available for their home. Without a plan doing it yourself is shotgun upgrading, in other words scattered without clear direction.

For example many homeowners opt to replace all the old windows in their home with new thermal double pane windows. Changing the windows may in fact not yield any appreciable energy savings. Nonetheless many people go for the windows first when energy upgrading.
With an energy audit plan it may be revealed that the most cost effective places to spend that window money is on insulation and setback thermostats. Making decision without the advice and expertise of an energy saving professional can merely leave you poorer with no or little energy savings to show for you expenditures.

Some upgrades can and should be done by the homeowner. The easiest of these is changing your old light bulbs to compact fluorescents. But don’t expect to see dramatic savings in your electric bill. Lighting constitutes about 12 percent of the average families’ electric usage. This equates as follows; for a $150 a month electric bill, $18 is for lighting. Cfls save about 50-75% over incandescent bulbs. Therefore the monthly savings is $9-13 or $108-156 yearly. Not a great deal of money, but certainly a worth while investment.

This brings up the point of energy investments. Most energy improvements are investments, they pay for themselves and then some over the life of the component. What is vitally important is to identify where and what are the best energy investments for your home and budget.
A home owner working together with a trained and experienced energy professional can establish the most valuable energy upgrades for their particular home. This would include those DIY projects from the plethora of tips and advice columns.

Since the idea of energy improvements is saving money, be sure to find and use an energy professional who will show you where and how to invest wisely.

Friday, November 30, 2007

Electrifying Heights, New Haven, CT

The wire that brings electricity into a home is referred to as the service drop conductor (blue arrow). This is connected to the service entry conductor (red arrow). The point at which they are connected (yellow arrow) is most often the demarcation between the homeowners' responsibility and the utility companies' responsibility. The minimum safe height from the ground of these components is 10 feet for the service entry conductor (yellow) and 12 feet for the service drop conductor (blue).

This particular service drop and entry was suspect on initial inspection. The lowest point of the service conductor, the drip loop, is less than 9 feet from grade. This can be determined by counting the bricks. The width of each brick is 2 ¼ inches adding a mortar joint brings it to about 3 inches. This method is better than using a metal tape measure to check the height and a lot safer! There are 33 rows from grade to the bottom of the drip loop. 33 x 3 = 99 ÷ 12 = 8.25.

This would then mean the service drop is also too low. The margin of his rough estimate (over one foot) is certainly wide enough to warrant further evaluation by an electrician. The service entry conductors' height will likely need to be extended to fall within the safety parameters previously discussed.

Taking risks with electricity is never advisable. Minimum safety requirements are in place to protect people from serious injury or death. A knowledgeable home inspector can heighten your awareness of potential problems and spare you shocking surprises after your purchase.

James Quarello
JRV Home Inspection Services, LLC


Monday, October 8, 2007

It’s Raining in the Attic, Inadequate Ventilation, New Haven, CT

When inspecting a 1940s colonial I noticed the roofing shingles had an unusual and uneven pattern of ageing. Viewing the home from the rear, the left side of the roof covering was distinctly more cupped, curled, and dried than the right side, which was fairly smooth.

Going into the attic I noticed there was only one gable end vent, which was on the right side of the home as viewed from the rear. This was the side with the better looking shingles as described previous.
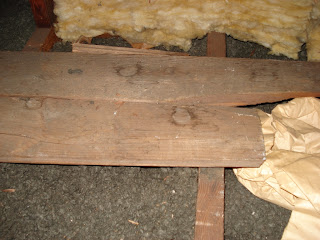
I then look around on the floor of the attic for other tell tale signs of problems. I noticed the spots on the board in the first picture. Then on the attic scuttle cover in the second. Most often these water spots are thought to be from roof leaks. Actually they are from condensation dripping from the roofing nails. This is caused by inadequate attic venting. Moisture from the home is trapped in the attic and will condense on the cold metal roofing nails and drip.
If the moisture content is high enough it can cause mold or mildew to grow on the wood. A very easy way to spot a possible venting problem is to look at the wood surrounding the nails. If there is a black ring around the nails, this indicates moisture is condensing on the nails and the wood is absorbing the water and blackening.
Other problems are over heating of the attic, which can cause shingles to dry out, curl and prematurely age. As I saw on the back side of the roof.
The solution in this case was to add another end vent and if needed a ridge vent. This should prolong the life of the roof and stop the rain from pouring in the attic.


James Quarello
JRV Home Inspection Services, LLC


Thursday, September 6, 2007

That’s Not Rain Drops Falling Down Your Chimney

A common problem with oil fired heating appliances, especially newer more efficient models, is condensation of combustion gases inside the chimney flue. This appears on the unit and flue pipes as a rust like substance running through the flue joints. This problem is very often misdiagnosed as rain water flowing down the flue. The solution is usually to put a cap on the chimney flue to "stop the rain". This fix worsens the problem.

What is in fact occurring is the combustion gases are cooling to quickly inside the flue and condensing. Oil is about 15 percent water and when burned the water in the oil turns to vapor. Normally the combustion gases carry the water vapor out the flue, but if the gases cool to quickly the water begins to condense inside the flue.

What can cause condensation to occur are any number of factors. A long chimney and or a large flue in combination with a newer efficient unit are most often the cause. A long chimney allows more time for the gases to cool. A large flue area can not be warmed enough by the gases expelled from the unit to create good draw to force the gases out the flue quickly.

Newer heating units are more efficient than their predecessors. This results in lower combustion gas temperatures expelled from the unit into the chimney flue. Older units stack temperatures (where the combustion gases leave the unit) were around 600º F, today they are about 450º F or lower.

Another reason this phenomenon can occur is an extremely dirty chimney flue. Many homeowners do not understand that their oil service technician does not clean their chimney. So the chimney is unknowingly neglected and over time these stains will often appear. Also the unit will be more difficult to tune becoming less efficient and consequently more costly to run.

The unit pictured had a somewhat different problem. This is a replacement for the original furnace installed in this Meriden, CT townhouse condo. The chimney is entirely constructed of metal with an integral cap. This type of chimney is usually "tuned" to the furnace it vents. So when the new furnace was installed the venting conditions changed subsequently causing condensation and the stains. It was also discovered during the inspection there was a large gap around the burner tube penetration into the ceramic combustion chamber. This may also be a contributing factor to this units venting problems.

Good technicians and installers today are aware of this problem and are addressing the issue in a number of ways. The most common is a stainless steel liner inserted inside a masonry chimney flue. The round insert is correctly sized to the heating unit to provide optimum venting.

Another option is direct venting. The furnace is vented into a short pipe through the wall. This requires no chimney of any kind and is becoming much more commonplace.

I would also recommend Steven Smiths blog on chimney liners for some further information on the topics touched on here.

So the next time you see water and rust stains on an oil fired heating system flue, it's not rain drops falling down your chimney. It means it's time to call in a professional to tune up your system.

Thursday, August 16, 2007

Why People Should Use a Realtor, An Inspectors View

Yes, that's right a home inspector writing on why people need to use real estate agents. In the last two months I have inspected several home that were FSBOs. Some of these inspections were nothing out of the ordinary, some were nightmares. The common denominator, no Realtors.

Why is it when no agents are involved that people seem to think it is the home inspectors' job to advise them on resolving and negotiating home inspection issues? I am not a Realtor, and have no training or interest in that facet of the real estate process. But I continually get put on the spot by my clients.

My experience has been some people are fine with the FSBO process and others haven't got a clue. I can recall two recent examples of people who very desperately need a Realtor.

The first were clients of mine working without an agent buying a FSBO home. They were high maintenance clients and constantly asked how to resolve and negotiate the issues discovered. I was polite and professional with them, but the whole time I am thinking, "GET A REALTOR!"

The other was the same circumstances except the sellers were the problem. They had requested directly from me information from the inspection. I informed them that I can not release inspection information unless my client gives me permission or they can obtain it directly from the client.

They got very angry when I informed them of this client confidentiality. I was told it is our house, etc. I ended up receiving a registered letter from them informing me of their dissatisfaction. In a nut shell they are completely clueless of the home sale and inspection process and it is clearly evident from their reactions.

I have come to appreciate more and more the role of the real estate agent. These recent experiences have shown me that having a professional to guide someone through the home buying-selling process is invaluable. It definitely can make my job easier.

James Quarello
JRV Home Inspection Services, LLC